
Although any type of leather can be hand sewed, the leather of choice for these instructions will be using vegetable tanned leather.

Vegetable tanned leather has been tanned with natural agents, such as wood and vegetable oils. The end product is a firm but flexible leather that can be molded to shape, dyed and stained to color, or tooled and stamped with pictures and designs.
Vegetable tanned leather can be derived from any animal hide: cow, horse, lamb, goat, and pig.
Tools needed will be:
- Large Eye Needle
Large eyes are convenient when working with waxed thread
- Linen Waxed Thread
Waxed thread is used when stitching leather to help protect and aid the thread from fraying or breaking
- Stitching Awl
For making holes for each stitch
- Stitching Groover
Used for channeling a groove into leather allowing the thread to sit within
- Stitching Wheel
The stitching wheel is used to keep spacing correct in between each individual stitch
- Contact Cement
Since leather will flex and bend, it is important to use contact cement to adhere leather. Contact cement stays flexible and contours with movement. In this manual we will be using Masters Contact Cement™.
- Vegetable Tanned Leather
Two pieces of small cowhide rectangle shapes

To begin your hand sewing project you need to prepare your needle and thread
1. Pull two arms lengths (or approximately 2 yards) off your spool of thread. Pulling off to much thread can be difficult to work with and become tangled while your working. Don’t worry about not having enough, we will address the issue of running out later.
2. Each end of your thread will get a needle
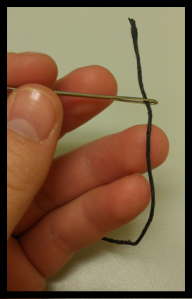
3. Placing the thread through the eye and pullout about an inch
4. Pierce the thread with the needle, as shown

5. Push thread up on needle to the eye
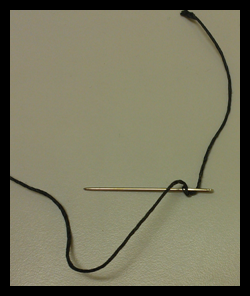
6. Hold the needle and pull the long end of the thread over the eye to make a locking end
*Repeat steps 1-6 for other needle
Preparing the Leather
1. Place both pieces of leather rough side up on the work space
2. Apply THIN coats of glue to each piece and let COMPLETELY dry
3. Then apply another thin coat to each piece and right before they are completely dry place together.
This allows for a strong bond between the glue and the leather to form, properly holding your leather in place.
Grooving your Leather
1. Taking your saddle groover adjust the length of the arm to fit how far away you wish your stitches to be from the edge of the leather. This can be done by loosing the cylinder and pulling the arm in out to desired length.
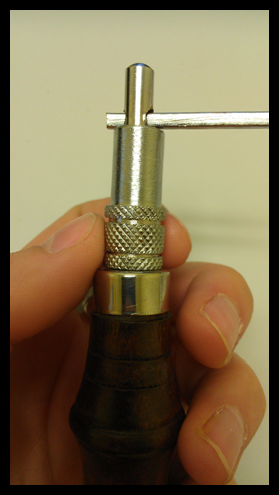

2. After a comfortable length is determined, tighten the cylinder back down
3. Place the arm with the hole end on the leather

4. Firmly push down and pull towards you, this will create a straight channel next to the edge of the leather

5. Continue by going all the way around your project
Grooving also allows the thread to set off the surface of the leather, protecting it from being rubbed, cut, or worn.
Marking Stitches
1. Dampen leather with water along the channels, this allows leather to take the stitch marks
2. Keeping within the channel run the stitching wheel around the project

3. Continue completely around project until finish

Preparing for Stitching
1. Start by taking your stitching awl and stab four holes where the stitching marks are places. Keep the blade of the awl the same direction throughout the entire project. This will allow for a more uniform stitch. Since leather shrinks and holes tend to tighten back up, 
We will only be stabbing four holes at a time.
2. Take your thread with needles on both ends, and place one needle through the hole in which you wish to begin.

3. Pull thread through and make it even on both sides of the leather, like you would shoestrings.

Starting your stitch
1. Starting with the right needle, push it through the hole above the hole your thread is currently in

2. Next take the left needle and place it through the same hole you push the right through

3. Pull both sides of the thread tight. It is important to remember how you pulled the thread because you will need to do this every time. This helps keep the stitches uniform.

Continue on by repeating steps 1-3, remembering to pull your thread tight and stabbing four holes at a time to stitch though
Running out of Thread
Don’t Panic!
1. Cut off needles and tie thread together on top of the edge of your project

2. Prepare new needle and thread the same as before
3. Place one needle through your third stitch back and make thread even on both sides

4. Begin stitching again, just like before but going over your four stitches. Don’t worry about the tied thread, we will deal with it at the end

5. Continue stitching, weaving the needles and thread in and out, just like before.
Ending Your Stitching
YOUR ALMOST THERE!!
1. When you get to the end of your project and your stitches meet up, you will need to continue to sew over where you started 3-4 stitches. This will allow to the thread to bind within itself and no tying is required
.


2. Cut each end of the thread off close to the stitch and burn the end with a lighter. This will cause the wax and the thread to ball up

3. Take your finger and push this ball while still warm into the stitch. CAUTION: Wax maybe hot!
4. If you had areas where you ran out of thread and knotted them on the edge of the leather take scissors and cut these off close to the stitch also burn the ends and pushing them into the stitch.
And… YOUR DONE!!!